


Happy Tuesday! Are you ready for another Techy Tip?

I was looking over my past Techy Tips posts and realized I never did a post on how to make a button for your blog or shop!
So here we go.
You can do this many different ways, but I will show you using PicMonkey:)
Step 1: Start off my uploading an image to PicMonkey.

Step 2: Resize the image into a square. Any size will work.

Step 3: Add text and save.

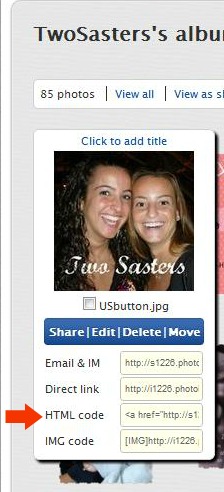
Step 4: I saved this image to my Photobucket account, just like we talked about here and copied the HTML code.
Step 5: Head back over to your blog's dashboard. Under Layout, select "Add a Gadget".

Step 6: In the Gadgets menu, select HTML.

Step 7: Paste your code (a control-V will do the trick) and save.

Step 8: Change the HTML so that when a user clicks on your button they will go directly to your site.
Replace what is highlighted in RED with your site's address
<a href="http://s1226.photobucket.com/albums/ee412/TwoSasters/?action=view&current=USbutton.jpg" target="_blank"><img src="http://i1226.photobucket.com/albums/ee412/TwoSasters/USbutton.jpg" border="0" alt="Photobucket"></a>
It will now look like...
<a href="http://www.twosasters.com" target="_blank"><img src="http://i1226.photobucket.com/albums/ee412/TwoSasters/USbutton.jpg" border="0" alt="Photobucket"></a>
Step 9: Resize your button. I usually do a 125 x 125 button, but you can choose any size you like.
Add height and width as shown in BLUE.
<a href="http://www.twosasters.com" target="_blank"><img src="http://i1226.photobucket.com/albums/ee412/TwoSasters/USbutton.jpg" border="0" alt="Photobucket" height="125" width="125"></a>
Step 10: Save and admire!

You will have to come back next week for Part 2 - adding a grab box so that others can place your button on their blog!
See you then!

Ooh, a cliffhanger :). So glad I'll have your tutorial to reference next time I delete my button :) Another great tutorial.
ReplyDeleteYou rock! I love Techy Tuesdays! Thank you :D
ReplyDeleteIt looks so easy here.=) You girls are the greatest. This has to be one of my favorite posts every week. Thanks for putting your know how out there for us.=)
ReplyDeleteYou always have such great tips, thanks for sharing.
ReplyDeletewhat a great tip thanks for sharing
ReplyDeleteNice! You guys always have great tips. Thanks for sharing at our Handmade Tuesdays party.
ReplyDeleteThank you so much!! Your tips make me look like I actually know what I am doing!
ReplyDeleteGreat tutorial; I love that you guys do these techy tips! Thanks so much for sharing this at The Fun In Functional!
ReplyDeleteYou explaind it verry good. I'll try to make myself one. Thanks.
ReplyDeleteThank you!! I had no idea how to do this!
ReplyDeleteGreat tips and simple instructions! Just found you two today and I am now a new follower to your blog. Hope you will do the same! Please pop over for a visit~Angie
ReplyDeleteThank you so much for the great info! Your newest follower from Happy-Go-Lucky. :)
ReplyDeleteAnother AWESOME tip! Thanks!
ReplyDeleteThanks for sharing with my Super Link Party! :-)
thank you so much for the 'how to' - I will be using this in the future!
ReplyDeleteGreat tip! Thanks!!
ReplyDeleteDebbie :)
You guys always have great tips! Thanks for linking up on Saturday Show and Tell. I hope you'll be back again this week with some more of you great ideas.
ReplyDelete-Mackenzie
http://www.cheeriosandlattes.com