Tuesday, July 31, 2012

Techy Tips - Grab Box for your Button

Happy Techy Tuesday!!!


In case you missed it, last week we talked about how to make a button.

Now let's add a grab box for your button so that others can take your button code and add it to their blogs too!


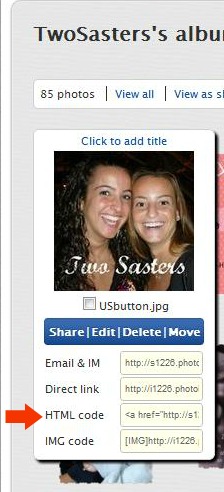
If you remember from last week, this is the code we used for our button:

<a href="http://www.twosasters.com" target="_blank"><img src="http://i1226.photobucket.com/albums/ee412/TwoSasters/USbutton.jpg" border="0" alt="Photobucket" height="125" width="125"></a>


To make the grab box code, copy your button code above AND add the following in green before and after your code:
<textarea>  YOUR CODE HERE </textarea>

In my example this is what it would look like:
<textarea><a href="http://www.twosasters.com" target="_blank"><img src="http://i1226.photobucket.com/albums/ee412/TwoSasters/USbutton.jpg" border="0" alt="Photobucket" height="125" width="125"></a></textarea>


Using what we learned last week and our new grab box code above, let's put them together.  {Note that your button code is listed twice because you want your button to appear on your site as well we be available for others to "grab" it as well.}


Your finished product!


Note that if you would like to center everything, you could always add the <center> tags.  Remember from way back here.


 Happy Techy Tuesday!!  See you all next week:)

Linking up to these great parties:)
Share

Monday, July 30, 2012

Shop Handmade on Mondays - {Linky}

Hope everyone had a terrific weekend!!!

Do you ever find yourself searching for blank cards?  Take a look at these Musical Moments Greeting cards by Sent With Love From Me 2 USo pretty!!


♥♥♥♥♥

I have so much fun selling our Handmade items in our Etsy Shop and I know so many others out there feel the same way I do:)  That being the case I have decided to promote handmade items every Monday by hosting a weekly Link-up party...YAY!


So for all of you small business owners selling handmade items (on Etsy or elsewhere), please feel free to join in on the fun and promote your items!!


Two Sasters


After you have linked up your handmade items we would LOVE it if you:

♥ Follow Two Sasters (via GFC or email)
♥ Visit other shops that have linked up


Link up here!! Note:  It would be helpful if you could include a description of what you sell in {}'s - for example: CGCDesign {children} 


Share

Sunday, July 29, 2012

Giveaway from Your Title Here Etsy Shop

If you haven't already met Lauren over at Tutus and Tea Parties, you should definitely head over there and get to know her! 

Lauren has been blogging for a little over a year now and recently decided to open up an Etsy shop called Your Title Here {maybe you remember from our feature on Monday}.

YourTitleHere offers custom blog, shop and Facebook banners and buttons.  Lauren can also make social media buttons, grab me buttons, blog banners with clickable social media buttons and more. If there is something you need and don't see it in her shop, she would happily work with you.

These are some examples of her work that she has up for sale:


Lauren is offering one lucky reader custom designed social media buttons!!  Enter to win below!  Good Luck!


a Rafflecopter giveaway
Share

Thursday, July 26, 2012

TGIF #29 - Share what you did this week:)

TGIF!!!

How adorable is this Octoapple shared by 21 Rosemary Lane?  I can't wait to try this for my little one:)


If you were featured, be sure to grab a button here.


♥♥♥♥♥

Without any further delay...let's start the party!  

What have you done this week???


Two Sasters


After linking up we would LOVE it if you:

 Follow Two Sasters (via GFC or email)
 Grab a button and place it somewhere on your blog
 Visit others, get ideas, be inspired, make friends :)

 By linking up your photo, you give us permission to use them in features 

Share

Co-Hosting BlogLovin' Blog Hop


Photobucket

I am super excited to be co-hosting a Bloglovin' Blog Hop with Jenny from The NY Melrose Family, Amy from While Wearing Heels, Pam from Pam's Party Planning & Practical Tips,  Kristy from Cup of Jo, Carrie from My Favorite Finds,  Megan from Our Pinteresting Family, Barb from Second Chance to Dream, Jacqueline from The Detox Diva and Megan from Shaping Up to be a Mom for the month of July. 


What's Bloglovin' you ask?  Well, only the greatest way to keep track of the blogs that you love.  With the discontinuation of Google Friends Connect, I decided that I needed to find another way to keep up with all of my favorite blogs that are not hosted by blogger.  I signed up for Linky Followers and I've had great success with gaining new followers, but I’m finding I don’t get any traffic to my site from Linky.  I also do not enjoy reading my favorite blogs from there.  I stumbled upon Bloglovin' and I am in love!  It is very similar to Google Reader, in that you can see the beginning of the post and the first picture attached to the post.  Plus, Bloglovin' automatically updates your posts, unlike Linky Followers, which you have to manually update each time you write a new post.  I don't know about you, but I just don't have the time to do that every time.  Another added bonus is there is a Bloglovin' application for IPhone and Android devices.  Woohoo!  Like I don't spend enough time reading blogs.  Now it's a simple touch.  Love it!


***These are the complete instructions for sign up, so skip to the rules if you already have Bloglovin'***
In order to participate in this hop you need to sign up for Bloglovin’.  Go to Bloglovin'.   Hit the green sign up button in the right hand corner.  Next enter an email address and create your password.  You will get a confirmation eamil that you will need to follow a link back to Bloglovin' to continue the process.  Once you click on the link you will be brought to a page where it says to choose blogs to follow.  You don't need to do this.  Click next in the bottom right hand corner.  The next screen let’s you know about the mobile app so just click next again.  This screen will show that you are not following any blogs.  Click on Account in the upper right hand corner and toggle down to widget.  Choose the widget you want displayed on your page.  Put your url into the search query and it should pull up your site.  Click on your site and it will say display this icon.  The next page should bring you to a screen that has you display it into your layout.   Once you hit publish you’re done!  If you view your blog you should see the icon and now your followers can add you to their Bloglovin’ feed.  Seriously, so simple.  So let’s get to the blog hop.  This is a party so make sure to have some fun and mingle.


 There’s only a couple of rules:

2.      Add Bloglovin' to your blog.


3.      Post our button for the blog hop on your page to promote the fun.


Photobucket


If you're interested in co-hosting next month, send Jenny an email at russej10@gmail.com.  Let's have some fun and mingle!  Please link up your bloglovin profile.


Share

Wednesday, July 25, 2012

Wordless Wednesday - My City!

We live about 30 miles north of NYC:)

Happy WW!!!


Linking up to these great parties:)
Share

Tuesday, July 24, 2012

Techy Tips - Buttons Part 1

Happy Tuesday!  Are you ready for another Techy Tip?


I was looking over my past Techy Tips posts and realized I never did a post on how to make a button for your blog or shop!

So here we go.

You can do this many different ways, but I will show you using PicMonkey:)

Step 1:  Start off my uploading an image to PicMonkey.


Step 2:  Resize the image into a square.  Any size will work.


Step 3:   Add text and save.


Step 4:  I saved this image to my Photobucket account, just like we talked about here and copied the HTML code.


Step 5:  Head back over to your blog's dashboard.  Under Layout, select "Add a Gadget".


Step 6:  In the Gadgets menu, select HTML.


Step 7:  Paste your code (a control-V will do the trick) and save.


Step 8:  Change the HTML so that when a user clicks on your button they will go directly to your site.

Replace what is highlighted in RED with your site's address

<a href="http://s1226.photobucket.com/albums/ee412/TwoSasters/?action=view&amp;current=USbutton.jpg" target="_blank"><img src="http://i1226.photobucket.com/albums/ee412/TwoSasters/USbutton.jpg" border="0" alt="Photobucket"></a>

It will now look like...

<a href="http://www.twosasters.com" target="_blank"><img src="http://i1226.photobucket.com/albums/ee412/TwoSasters/USbutton.jpg" border="0" alt="Photobucket"></a>


Step 9: Resize your button.  I usually do a 125 x 125 button, but you can choose any size you like.

Add height and width as shown in BLUE.


<a href="
http://www.twosasters.com" target="_blank"><img src="http://i1226.photobucket.com/albums/ee412/TwoSasters/USbutton.jpg" border="0" alt="Photobucket" height="125" width="125"></a>

Step 10:  Save and admire!


You will have to come back next week for Part 2 - adding a grab box so that others can place your button on their blog!

See you then!


Linking up to these great parties:)
Share

Monday, July 23, 2012

Shop Handmade on Mondays - {Linky}

Happy Monday!!  Hope everyone had a terrific weekend!!

Lauren from Tutus and Tea Parties recently opened up a new Etsy shop called Your Title Here where she is selling basic custom blog, shop and Facebook banners and buttons.   Go check out her new shop!!
Check back later on in the week - she wants to celebrate opening up her shop with a giveaway!!!

♥♥♥♥♥

I have so much fun selling our Handmade items in our Etsy Shop and I know so many others out there feel the same way I do:)  That being the case I have decided to promote handmade items every Monday by hosting a weekly Link-up party...YAY!


So for all of you small business owners selling handmade items (on Etsy or elsewhere), please feel free to join in on the fun and promote your items!!


Two Sasters


After you have linked up your handmade items we would LOVE it if you:

♥ Follow Two Sasters (via GFC or email)
♥ Visit other shops that have linked up


Link up here!! Note:  It would be helpful if you could include a description of what you sell in {}'s - for example: CGCDesign {children} 


Share

Sunday, July 22, 2012

Camp Bag

If you follow us via Facebook or Twitter, you might have already seen the bag I made for my daughter to take to camp.


It might be a little big for her, but it is the perfect size to fit an extra pair of clothes, towel and sunscreen:)


I just love it!!

A huge thanks to Skip to My Lou for a fabulous tutorial that was simple to follow!!

Best part?  It is reversible!!!!!

Linking up to these great parties:)
Share

Thursday, July 19, 2012

TGIF #28 - Share what you did this week:)


Is it the weekend yet?!?!

Thanks for sharing all of your wonderful projects!!

One of my favorites is this Stitched iPad Cover shared by Create, Craft, Love!  Wouldn't this make an amazing gift?!?!  LOVE!


If you were featured, be sure to grab a button here.


♥♥♥♥♥

Without any further delay...let's start the party!  

What have you done this week???


Two Sasters


After linking up we would LOVE it if you:

 Follow Two Sasters (via GFC or email)
 Grab a button and place it somewhere on your blog
 Visit others, get ideas, be inspired, make friends :)

 By linking up your photo, you give us permission to use them in features 

Share

Tuesday, July 17, 2012

Wordless Wednesday

The newest addition to our family is now 1 month old!


Happy #WW!!!

Linking up to these great parties:)
Share

Techy Tips - Email Signatures

Happy Techy Tuesday!!!!


Last week we talked about adding the same text or pictures automatically into each post (ie. your blog signature).

Jenny from The NY Melrose Family tweeted me {she has gotten me slightly obsessed with twitter:) } and asked if she could do the same to her email.  Great question!!!

Since Jenny uses gmail, let's start there!


Head over to the gear icon on the top right of your Gmail homepage.

Select "Settings".


Scroll down until you see "Signature".


Two buttons are of importance when creating your email signature.  You can add an image and also add links to your text.


For example...after clicking on the add an image button, you will be brought to this screen and asked to put in your image URL.  As discussed last week, I use photobucket to store my images.  I copied the URL from there.


You can also add text to your email signature.  This will allow your email readers to link directly back to your blog, your shop or whatever else you would like to include.


Once you are done it might look something like this....


When you are done, be sure to scroll down to the bottom and save your changes.


Compose a new email and voila!


Perhaps you are using something other then gmail?

For Hotmail users, same idea, just a different way of getting there:


As always, if you need help, don't hesitate to ask!!

Questions like this one are always welcomed:)

Linking up to these great parties:)
Share

Monday, July 16, 2012

Shop Handmade on Mondays - {Linky}

Hope you all had a terrific weekend:)

Thank you for linking up last week!!  Such cute items!!

Take a look at this adorable utility apron made by Zeeuh!  What a cute gift!!


♥♥♥♥♥

I have so much fun selling our Handmade items in our Etsy Shop and I know so many others out there feel the same way I do:)  That being the case I have decided to promote handmade items every Monday by hosting a weekly Link-up party...YAY!


So for all of you small business owners selling handmade items (on Etsy or elsewhere), please feel free to join in on the fun and promote your items!!


Two Sasters


After you have linked up your handmade items we would LOVE it if you:

♥ Follow Two Sasters (via GFC or email)
♥ Visit other shops that have linked up


Link up here!! Note:  It would be helpful if you could include a description of what you sell in {}'s - for example: CGCDesign {children} 


Share

Sunday, July 15, 2012

Learning our Colors - Toddler Activity

It rained today...ALOT!  So what's a mama to do with a toddler?  Make up another game of course:)

My little one knows her colors already, but I want to move on to some basic spelling.

I gathered some popsicle sticks and construction paper in different colors.  I wrote different colors on each of the sticks (in their respective colors).


As I wrote on the sticks, my little one placed it on the appropriate color.


Next I made a little "house" for the sticks.  By folding the paper a few times and using masking tape on the edges.


I asked her to read off the color on the stick and then spell it before she put the stick in it's "house".  


She had a great time and I snuck in a way to learn how to spell the colors:)


Linking up to these great parties:)
Share
Related Posts Plugin for WordPress, Blogger...