It's Tuesday - time for more Techy Tips:)
Want to spice up your side bar? Let's make some headers!!
To start off, create a blank white slate which we talked about last week here.
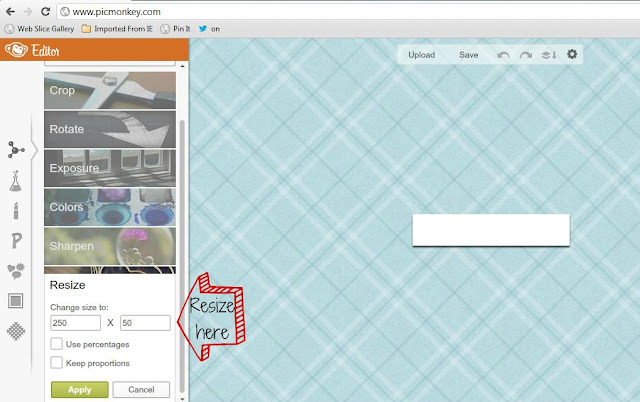
Next, you will need to resize. My sidebar headers are 250 wide by 50 tall, but you can customize to your own blogs size.
Be creative and using various fonts and pictures make a nice side bar header!
You will now need to save your newly created header image - I use Photobucket.
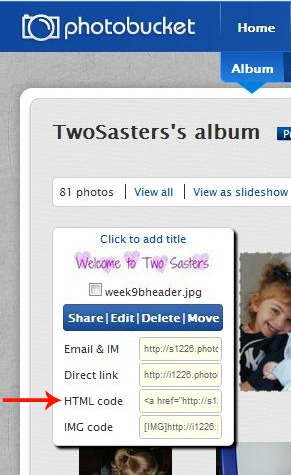
I like Photobucket because obtaining the HTML code is so simple!
Copy the HTML code. In Photobucket, all you have to do is click on the code and it is automatically copied! Like I said...simple!
Head back over to your blog's dashboard. Under Layout, select "Add a Gadget".
In the Gadgets menu, select HTML.
Paste your code (a control-V will do the trick) and save.
Sit back, admire...and then make a few more!!
Hopefully that inspired you to pretty up your blog! If you need any help, just ask!!
Note: For the headers on my side bar, I started out with digital scrapbook paper {which I hate to say I downloaded forever ago and I cannot recall where - once I find I will definitely add the source here} instead of the blank white image.


I have no idea how you make this look so easy. This would take me hours without your tutorial!
ReplyDeleteGreat tip. Looks like I know what I'll be doing Saturday night :)
ReplyDeleteThis is awesome!! Thanks for sharing!
ReplyDeleteAwesome...pinned this!
ReplyDeleteI was wondering how people did the custom category links on their sidebar. Thanks so much for teaching me! I am stopping by from Tip Toe Thur Tues. Hope to see you at True Aim.
ReplyDeleteLove this! What a great tip.. yall rock :)
ReplyDeleteThank you for this, I alwasy wondered how those cool side bar title were made.
ReplyDeleteThanks for sharing. I just found PicMonkey! I am loving it. I would like to make some buttons. I struggle with coding though. Anyway, so great to share with others!
ReplyDeletejulie @ Naptime Review
I just started using PicMonkey and absolutely love it! Thanks for the techy tips - I need them :)
ReplyDeleteSweet!!! I didn't realize it was this easy! Thanks!
ReplyDelete(I look forward to Tuesdays because I LOVE your techy tips!!!)
Thanks for sharing with my Super Link Party! :-)
DeleteThanks so much for these tips! I am always referring back them for guidance.
ReplyDeleteThis is awesome! I love your tips because I'm really challenged in this area.
ReplyDeleteI just found your blog thru the Tip Me Tuesday linkup party @ Tip Junkie.
ReplyDeleteI'm really looking forward to taking time to "dive" into all your "techy" posts...this new blogger needs some help!
Thank you!
Rhiannon at beingmomme.blogspot.com
Your tips are very much appreciated. You make it plain enough for everyone to understand.
ReplyDeleteGreat tutorial! It looks like I'm a few weeks behind on my Techy Tips - I always find these so helpful and easy to follow. I hope now that it's the summer I'll get a chance to put some of these awesome tips to use!
ReplyDeleteVisiting from The Grant Life :)
Found you guys through the Grant Life. Looks like you guys have lots of answers to my bloggy tech questions. Thanks for easy to follow explanations.
ReplyDeleteSo helpful!
ReplyDeleteGreat tips. This is on my blog to do list.
ReplyDeleteI'd love for you to link this post to my Finished Friday blog party.
This is a great tutorial. I'm going to be working on creative sidebar headers next week. Thanks for posting about this.
ReplyDeleteI'm glad you linked up at Romance on a dime!!
This is excellent, I love picmonkey! Thanks!
ReplyDeleteThanks so much for sharing this! As one who is very tech-challenged, you have inspired me to give it a try!
ReplyDeleteAwesome! I just used your tutorial to make some for my blog!
ReplyDelete